The Filter feature in
TRACE provides a simple and powerful method to quickly find information. Using
a filter, a user can:
● Set criteria to find
only the forms with the relevant field values they seek
● Use Boolean
operators, such as AND and OR
● Define how the
results display using a Format (see Formats)
● Export the results
for future use (see Export)
A filter can be saved
starting from a Quick Filter window.
Quick Filter
The Quick Filter feature provides a
filter-builder interface that displays above the Main pain. Select the Quick
Filter button on the Toolbar or New Filter link from Tasks pane.
Figure 3‑4: Quick Filter with Toolbar
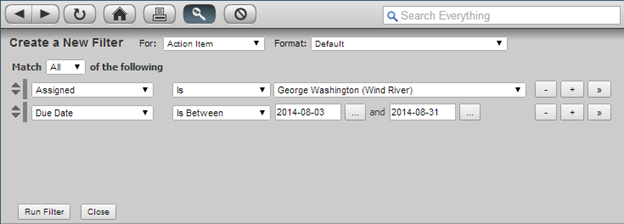
Each Quick Filter requires that a user
select the following as a minimum:
● Form Type on which the filter will be applied which
helps to narrow the search process. The filter can be applied on All Form Types or a specific form type.
● Format: Defines how the filter results display (see
Formats)
● Criteria: Defines the information that determines
which forms display in the filter results. Users must select at least one set
of criteria. Figure 3‑4 provides an example of a two-line set of
filter criteria.
In the figure above,
the filter results will display all forms where the Assigned field includes George Washington AND where the Due Date field contains a date between August
3, 2014 and August 31, 2014.
|
|
Note: The "All"
selection in the filter dialog is the same as a logical AND, meaning that a
form must meet every criteria set in the filter to be displayed. The
"Any" selection is the same as a logical OR, meaning that a form
must meet a minimum of one of the criteria to be displayed. |
A Quick Filter is not permanently saved
before it run. Quick Filters are useful when setting up a new filter because
users can easily make changes until the desired results are found. Once found,
users can click the Save... link in
the filter results to create a permanent filter.
In the example above, the Quick Filter will only search through Action Items for the criteria defined. For instructions on creating a new Quick Filter, see New Quick Filter.
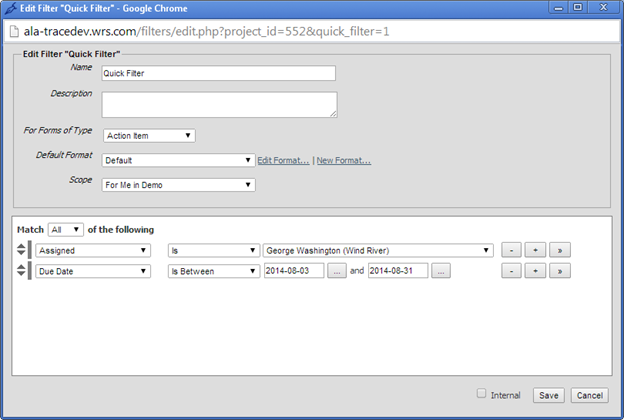
Save a Filter
From the Quick Filter interface, clicking on Save… link opens Edit Filter window which by default is filled in with settings from
Quick Filter. Each saved filter requires
that a user fill in the additional information:
● Name: Filter name will be displayed on the sidebar
● Description: A description of the filter helps to
understand what filter results represent.
● Scope: Defines who gets to use the filter. The
chosen scope determines where the filter displays in the Task pane, as well as
who else on the team can use it. Options include:
o
For Anyone in
<Project Name>: Once saved, anyone else on the project can
use it.
o
For Me in <Project
Name>: Only the user that created it can
access the filter.
o
For Me on Any
Project: Only the user can have access to the filter,
but they can use the filter on any project that they have access to on the
TRACE server.
● Internal: If Internal
is checked and Scope is For Anyone in <Project Name>, defines that only internal members of
the project can access this filter
Criteria, format
selection and form type selection works identical as in Quick Filter.
Figure 3‑5: Edit Filter Window
Default filters that ship with TRACE display in the Task pane as an active link under the Global heading. For instructions on creating a new filter, see New Filter.