See Filters for additional information on Filters.
To run a new Quick Filter:
|
Tutorials Available: Go to Working With Filters and Quick Filters for interactive tutorials on using filters. |
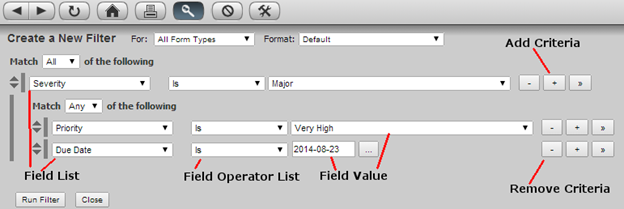
1. To run a filter on a
specific module, select the module button from the Module bar to create the filter for, then click New Filter…. The Create a new Filter dialog displays. Or, click the Quick Filter
icon ![]() on the Toolbar to
display the quick filter interface in the top of the Main pane. Initially, a
single row of drop-down lists display.
on the Toolbar to
display the quick filter interface in the top of the Main pane. Initially, a
single row of drop-down lists display.
2. Select the form
type(s) to run the Quick Filter on from the form types drop-down list.
3. Select the format that defines how the filter
results will be displayed
4. Select the first set
of criteria from the first list, on the left side. Depending on the selection,
the next drop-down list will provide a list of Boolean operators to choose
from, or a list of criteria relevant to the first selection.
5. From the second list,
select either:
The Boolean operator. Go to Step 6, below.
The relevant criteria. Go to Step 7, below.
6. Select the next set
of criteria from the third drop-down list. Note that the criteria in the first
list uses the Boolean operator to modify the criteria in the third list. For
example, a selection of Severity > Is
Not > Major would return all forms where the Severity field does not contain the text “Major”.
7. To add additional
filter criteria, click the plus (+)
button to the right of the row.
8. Performs Steps 4 through 7 as necessary to refine
the criteria.
9. Click the Run Filter button to run the filter.
Figure 5‑23: New Quick Filter
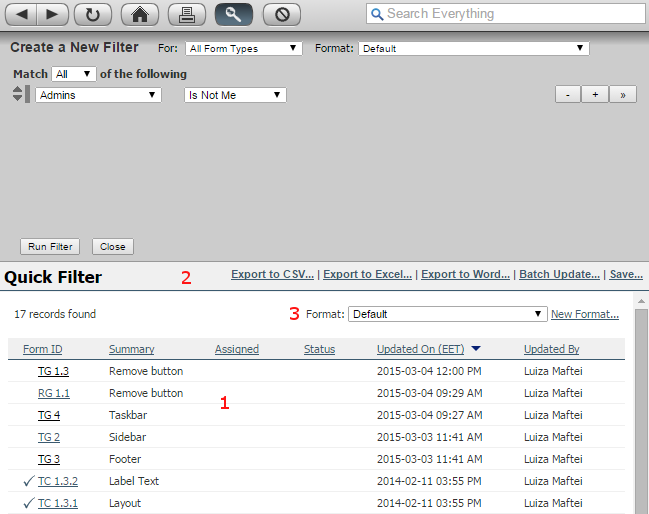
When the quick filter
completed running, the Content pane
displays (see Figure 5‑24):
1. filter results. Each
form result displays only the fields established by the chosen format.
2. action links for
filters:
o
export
options (Export to CSV, Export to Excel,
Export to Word)
o
Batch Update: performs updates on
multiple forms simultaneously (refer to Batch
Updates )
o
Save…: saving option for creating a saved filter form the
current quick filter
3. selected format and list
of available formats. The selected format can be changed by selecting one from
format list or creating a new format. Once the filter format is changed, the
filter results page reloads displaying the same set of results showing the fields
established by the new format.
Figure 5‑24 Quick Filter Run
See Filters for additional information on Filters.
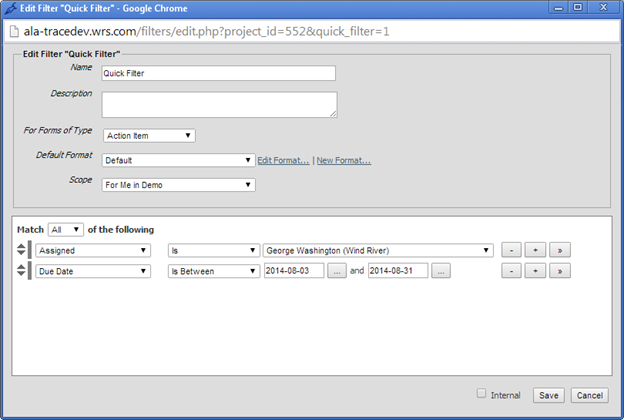
A quick filter that brings expected results can be saved
for later runs:
1. Run a quick filter
2. Clicking on the Save… link from action bar of the quick
filter. The Edit Filter… window
opens (see Figure 5‑25)
3. Complete the upper
section on the dialog: enter a name and description; then choose a format and
scope. See Filters for additional information.
● Select filter criteria
in the lower section of the dialog. Initially, this section loads the quick
filter criteria. It can be changed by adding or removing criteria.
4. Once complete, click Save.
5. Depending on the
selection in the Scope drop-down
list, the new filter will display in the relevant section in the Task pane using the name entered in the
Name field. Click this link to run
the filter.
Figure 5‑25 Edit Filter Window
View Filter Criteria
The Sidebar often displays global filters
or filters created by other users. Running one of these filters brings a set of
results, to understand what represent these results the filter name and
description help, but more helpful is to view the filter criteria.
There are two options
to see the filter criteria:
1. View the criteria
before run
a. For a filter
displayed in sidebar, click on [View]
link displayed next to filter name (see Figure 5‑26)
b. Edit Filter window opens showing the information of this filter.
Note that the Save button is not
available, instead there is a Save As…
button for
2. Run and then view the
criteria
a. On Sidebar, click on
the filter name to run the filter
b. Notice View Filter… link in the action links
bar displayed when the filter completes running
Figure 5‑26 View Filter
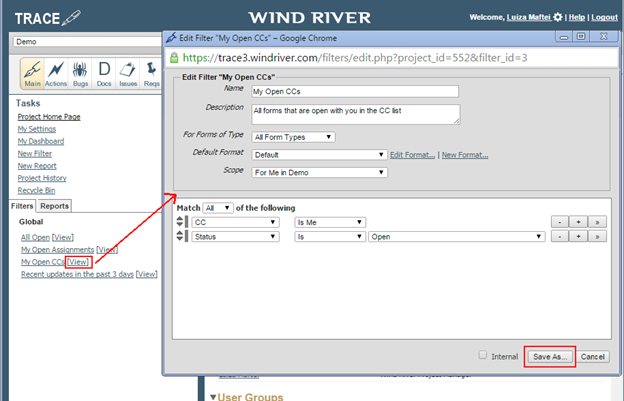
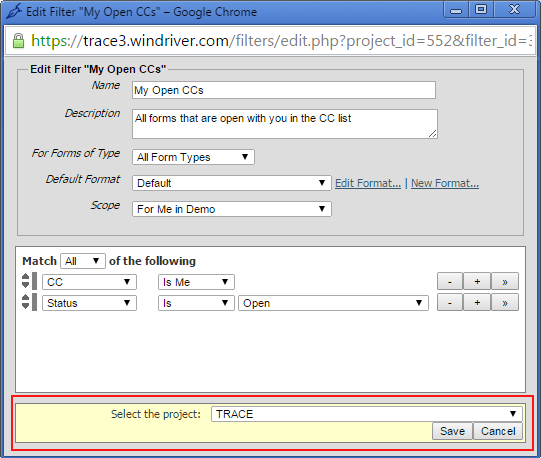
Save As a Filter
Saved filters can be
source for creating new filters. To save a new filter from an existing one:
1. Run the filter by clicking
on the filter name displayed on the sidebar.
2. Click on View Filter… link in the action links
bar displayed when the filter completes running.
3. Keep the filter as it
is or change its settings (name, description, filter criteria)
4. Click on Save As… button displayed at the bottom
of the window
5. Select the project
where you want to save the new filter, keep the current project or choose
another one from the list.
6. Click Save
Save As functionality
is very useful to:
·
create
a new filter in the current project starting from a global filter, change its
criteria, name, description and save as. For example, My Open CCs filter can be changed with a new criteria and saved as My Major Open CCs
·
create
a copy in another project starting from a current project filter, by keeping
all settings, click Save As… button,
choose the target project from the project list and click Save.
Figure 5‑27 Filter Save As