The following
procedure applies to adding or editing tree-type forms. In the default TRACE
setup, this includes requirements, requirement groups, tests cases, and test
groups.
An alternative to the
following procedure, are the advanced options given by Tree Editor for the management of tree structure.
To add a new or edit
an existing tree-type form:
|
Tutorials Available: Go to Standard Forms for a list of interactive tutorials on using forms. |
1. Select the project
from the drop-down list at the top of the Task
pane.
2. Select the Module
button from the Module bar. For
tree-type forms, this will be Requirements
or Tests.
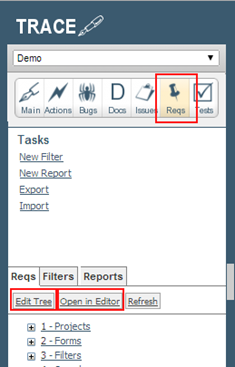
At this point, there
are two options to edit a tree, as shown by Figure
5‑5:
● Quick Edit Tree: an easy way to add forms to tree or to
reorder/rearrange the tree structure.
● Tree Editor: the same functionality as Quick Edit Tree
and more: complex way of view selection of fields, filters on tree forms,
backup and restore, baselines
Figure 5‑5: Edit Tree Options

1. Click Edit Tree on the Task pane to display the options for adding new groups and forms.
2. Choose one of the
following:
3. To add a new group: Click New
<Form Type> Group… on the Task
pane, where <Form Type> is Requirement or Test, to open the Create a new <Form Type> dialog.
a. To add a subgroup: Click New
<Form Type> Group… on the Task
pane inside the existing group structure.
b. To add a new form
item (to a group or subgroup):
1)
Navigate
to the group or subgroup that the new form item will be added to.
2)
Click
the plus (+) icon to expand the
group and/or display group options.
3)
Click
New <Form Type>… to display
the Create a new <Form Type> dialog.
c. To edit an existing group (or subgroup):
1)
Select
the group name from the tree list on the Task pane. The group form displays in
the Main pane.
2)
Click
Edit… in the Action links to display
the Edit Form dialog.
d. To edit an existing form item (inside a group or subgroup):
4. Drill down to the
group or subgroup where the item is located.
a. Click the form name
from the tree list on the Task pane.
The form contents display in the Main
pane.
b. Click Edit… in the Action links to display
the Edit Form dialog.
5. Enter and/or update
the necessary information in the fields for all the form’s tabs. See Fields for an explanation of field types and the expected
information.
6. Once all form information
is entered successfully, click Save.
Optionally, choose a save option from the arrow icon next to the Save button. Save options include:
a. Save as Copy: Select to use an existing form as a template and save
it using a different name.
b. Save & Keep Editing: Select to save the form’s work-in-progress.